In this tutorial we will show you how to install the Mysterious Android 4.4.2 Custom ROM on your HTC One HTC One. Before you can install the Custom Rom with this Tutorial you will need to root your HTC One and unlock the Bootloader. To find out how to do this, simply check out our HTC One Root and Custom Recovery Tutorial.
Backup Tutorials
Google automatically saves your contacts but doesn’t sync other files on your device. Check the following tutorials to completely backup your device.
- Backup Apps, Pictures and Ringtones from your Android Device
- Android SMS Backup & Restore Tutorial
- Backup Android Call Logs with Call Logs Backup & Restore
[tabs tab1=“ROM Features“]
[tab id=1]Removed software (CPU) rendering – full Snapdragon 600 (GPU) rendering
Fully optimized and tweaked
Root access
Unsecured boot.img
Newest BusyBox
RAM optimizations
System signatures check enabled for system security and safety
Improved virtual memory management
Speed optimizations
Enabled GPU UI rendering
Data, cache and system partitions mounting tweaks
Bloatware applications removed
All /system applications updated to latest available
All /data applications updated to latest available
Improved CPU governors performance
Most optimal system scheduler
Disabled kernel debugging for better performance
Zipaligned (Improved RAM management)
Zipalign on boot (for user applications on data partition)
Fully de-odexed
init.d scripts (BusyBox run-parts) support
Auto init.d permissions set on boot
sysro/sysrw commands support
Excellent battery life!
Improved EXT4 performance
OpenVPN support
Most up-to-date system files permissions
Adobe Flash Player support
Support almost 24h a day[/tab]
[/tabs]
HTC One Android 4.4.2 Revolution HD ROM
Things we will need
[checklist]
[/checklist]
HTC One Android 4.4.2 Revolution HD ROM Install Tutorial
- Download the Custom ROM
- Connect your HTC One with your PC and copy the two downloaded zip files directly into the internal storage of your HTC One
- Disconnect the HTC One from your PC and shut the device off
- Power on your HTC One while holding the Volume Up + Power-Button until you see the bootloader
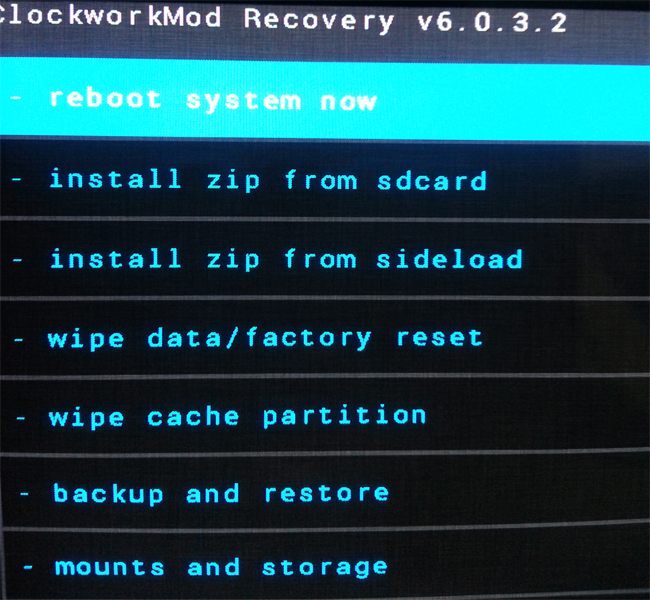
- Now use the Volume Buttons to select „Bootloader“ and press the Power Button then select „Recovery“.
- You should now see the Clockworkmod. First you will need to select „wipe data / Factory reset“ and use the power button to select
- Now select „wipe cache partition“ and press the power button
- Now select „wipe dalvic cache“ and press the power button
- Now select „install zip from sdcard“ and then select „choose zip from sdcard“
- Search for the copied .zip file for the Custom Rom and install it. ClockworkMod will present you with some security questions, simply answer them
- After the installation finished select „reboot system now“ to boot into the newly installed Custom ROM the first boot can take several minutes.