In this tutorial we will show you how to install the SmoothRom Custom ROM on your Google Nexus 7 Tablet. Before you can use this tutorial to install the custom rom you should root your device and install a Custom Recovery like the Clockworkmod. To find out how to do this you should take a look at our Google Nexus 7 Root and Custom Recovery Tutorial.
Google automatically saves your contacts but doesn’t sync other files on your device. Check the following tutorials to completely backup your device.
Backup Tutorials
- Backup Apps, Pictures and Ringtones from your Android Device
- Android SMS Backup & Restore Tutorial
- Backup Android Call Logs with Call Logs Backup & Restore
Google Nexus 7 SmoothRom Installation
Things we will need
[checklist]
[/checklist]
[tabs tab1=“ROM Infos“ tab2=“Features“ tab3=“Changes“]
[tab id=1]SmoothROM is the fastest and smoothest existing ROM.
SmoothROM is based on latest AOKP 4.3.1
SmoothROM is designed the way you want it.
SmoothROM is using Aroma Installer
SmoothROM let you chose the kernel you want before installing. [Stock, M-Kernel, LeanKernel]
SmoothROM let you chose select a REAL Tablet UI
SmoothROM is targeted for user that wants a CLEAN ROM experience including few Google Apps[/tab]
[tab id=2]
- Based on latest AOKP 4.3.1
- Aroma Installer : Let you chose what you want
- All AOKP Features!
- Tablet UI in Settings!
- OTA Updates using GooManager
- Ads blocker built in
- Busybox
- init.d support
- 720P Camera
- Deodexed
- Zipaligned
- Power Menu : Reboot Bootloader/Recovery + Screenshot + Profile
- Performance Menu
- Performances Improvements
- Smooth Experience
- Really Stable
- Much much much more
[/tab]
[tab id=3]November 1, 2013 – Version 5.3
- Updated to Android 4.3.1
- Updated to latest AOKP Base
- Many new features!
- Tons of changes that won’t be listed
- SmoothROM Wallpaper now embedded in Stock Wallpaper
- Updated ads blocker
- Updated kernels
- Removed incompatible and outdated kernels
- Tablet UI Improvements
- Updated Web Browser in Aroma
- New features in ROM Control
- Animations configuration
- Tons of bug fixes
- Tons of memory fixes
- Tons of new patches
- Way more Smoother
- More snappy
- Stability improvements
- Much much much more…
- Very reliable and stable!
June 17, 2013 – Version 5.2
- Updated to latest AOKP Base
- Added new features
- Updated ads blocker
- Updated kernels
- Tablet UI Improved a lot
- Nav bar can be hidden in Tablet UI
- Change StatusBar/NavBar text size [FINALLY!]
- New features in ROM Control
- A lot of bug fixes
- A lot of memory leak fix
- Exit from sleep faster
- Waaayy Smoother
- Stability improvements
- Much much much more…
- Very reliable and stable!
[/tab]
[/tabs]
Google Nexus 7 SmoothRom Installation Tutorial
- Download the SmoothROM and the JROM Flasher
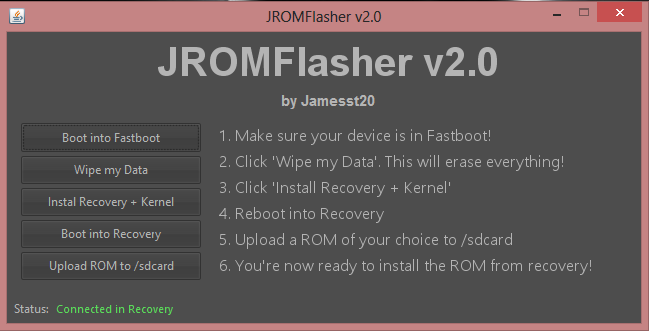
- Start the JROM Flasher with the executable file that works on your OS (Windows, Mac and Linux are supported)
- Install the USB Driver for your Nexus 7
- Connect your Nexus 7 Tablet to your PC
- In JROM Flasher select Boot into Recovery, if you don’t have any Custom Recovery installed, click on Install Recovery + Kernel
- After your device booted into the Recovery-Mode select „Wipe my Data“ in JROM. This will delete all your files from the device so remember to backup first
- Click on „Upload ROM to /sdcard/“ and select the Smoothrom zip
- If JROM doesn’t automatically install the ROM look on your Nexus 7 and select „install zip from sdcard“ in ClockworkMod. Then select „choose zip from sdcard“ and use the Volume Buttons to select the SmoothRom zip
- If your device doesn’t reboot after the installation select „reboot my device“ in ClockworkMod
- Your device should boot now, this can take several minutes so take your time.