In this tutorial we will show you how to root your LG G2 Rogers D802. For this to work you will need to enable the USB Debugging on your phone. To find out how to do this on newer Android Versions check out our Enable Developer Options in Android 4.2+ Tutorial.
Backup Tutorials
Google automatically saves your contacts but doesn’t sync other files on your device. Check the following tutorials to completely backup your device.
- Backup Apps, Pictures and Ringtones from your Android Device
- Android SMS Backup & Restore Tutorial
- Backup Android Call Logs with Call Logs Backup & Restore
LG G2 Rogers D802 Root
Things we will need
[checklist]
[/checklist]
Important Informations
- Always use a USB-Port from the backside of your PC
- Always use the original USB cable
- Always use a fully charged device
- Always Backup your Device first
Supported Operating Systems
- Windows XP
- Windows Vista
- Windows 7
- Windows 8
LG G2 Rogers D802 Root Tutorial
- Download the LG USB Drivers and install them on your pc
- Make sure you have USB Debugging enabled and connect your LG G2 Rogers D802 to your pc
- Download the ioroot10.zip and extract its contents to a new folder on your desktop
- Double Click on the root.bat file in the ioroot10 folder
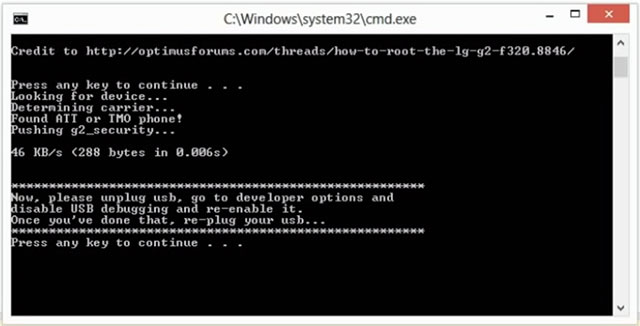
- You will now see a command window, press any key to continue
- You should now see that the batch file found your LG G2 Rogers D802
- You now have to disconnect your phone from the usb cable and deactivate USB Debgging. Now enable USB Debugging again and reconnect the USB cable.
- Now press any key to continue
- You will now get a Warning Message that tells you that you will lose your waranty if you choose to root your device. If you are ok with that, press any key to start rooting
- Your device should now be rooted. You should find the SuperSU App in your Apps, if thats not the case just download „SuperSU“ from the Google Play Store
