In this tutorial we will show you how install the ClockworkMod Custom Recovery on your HTC One. This tutorial is a follow up to our HTC One Root and Bootloader Unlock Tutorial so be sure to check that out first. We will use the HTC One All-in-One Toolkit for the installation of the ClockworkMod
Google automatically saves your contacts but doesn’t sync other files on your device. Check the following tutorials to completely backup your device.
- Backup Apps, Pictures and Ringtones from your Android Device
- Android SMS Backup & Restore Tutorial
- Backup Android Call Logs with Call Logs Backup & Restore
HTC One ClockworkMod and Clockworkmod Touch
Thins we will need
[checklist]
[/checklist]
Important Informations
- Always use a USB-Port from the backside of your PC
- Always use the original USB cable
- Always use a fully charged device
- Always Backup your Device first
Supported Operating Systems
- Windows XP
- Windows Vista
- Windows 7
- Windows 8
HTC One ClockworkMod Install Tutorial
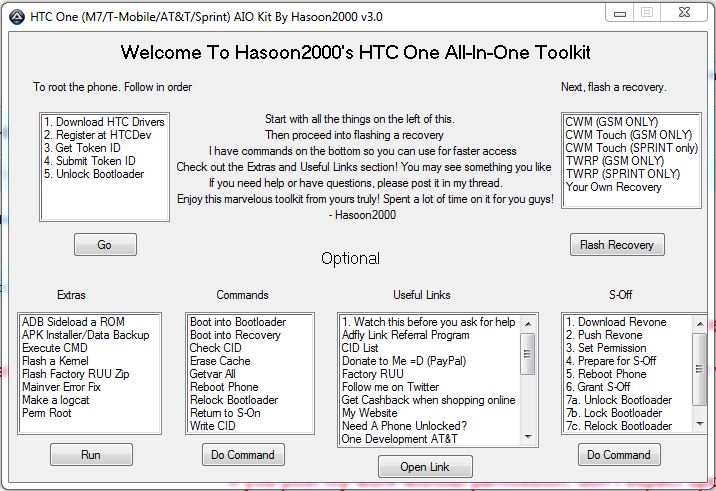
- Launch the HTC One Toolkit
- Install the HTC One USB Drivers
- Connect your device to your pc
- In the HTC One Toolkit Select the ClockworkMod that suits your phone. There are seperate version for GSM Phones or devices that are from SPRINT. You can also choose between the normal ClockworkMod an the Touch version, we recommend you use the normal version of ClockworkMod
- Now click on the „Flash Recovery“ your Device should reboot into Fastboot and install the Custom Recovery now.
- To exit the Custom Recovery after flashing it, simply select the menu entry „Reboot“. To navigate use the Volume Up and Volume Down keys, you can select with the power button
- You now have the ClockworkMod Custom Recovery installed on your HTC One : )
Info: To access the ClockworkMod Recovery you will need to make sure that you don’t have „Quickstart“ enabled under Settings -> Power. Power off your device and power it on while holding the Volume Down + Power Button until you see the recovery.